Tuesday, April 25, 2017

Testing, Procurement, Fabrication

The second set of charging components were tested on two different occasions. All components functioned properly. The wiring connections between components will need to be replaced as most of the wiring were either missing, damaged, or improperly stripped when received. Crimped spade connectors will be used at the ends of each wire that connects to screw-down connectors. Exposed opposite polarity wires in close proximity to each other is a safety hazard that must be avoided.

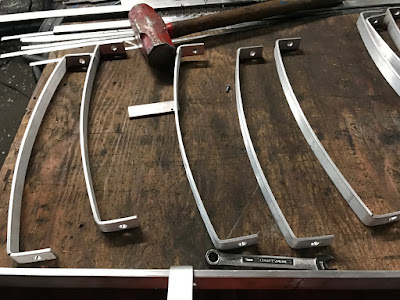
Materials and hardware were purchased last week and dropped off to Kevin from the Manufacturing Team to construct the second solar panel rack. Half of the first rack was also borrowed to modeled off of to build the second. I will be responsible for the purchasing and fabricating the battery box to store charging components once wiring is sorted. The latest progress is pictured below.


In response to the low run time of batteries reported by Chris from the Controls Team, new batteries will be purchased. Battery selection began with analysis of the conditions and system the batteries will operate in. The motors on the pod cars have a maximum voltage input of 6 volts. The spacing within the cabins of podcars are limited to about a volume of approximately 16 square inches. After discussing with Eric, the budget for new batteries are limited approximately $100. Two different chemical composition of batteries were explored.

The first battery examined are a pair of 18650 lithium ion (Li-ion). In order to use this battery, each pod car would require a step-down voltage regulator. This additional component for each podcar increased cost significantly and minimized the amount of batteries that could be purchased with the remaining budget.

The other option is to purchase batteries similar to the 4 cell 4.8V nickel-metal hydride. For roughly $14 each, a 5 cell 6 V nickel-metal hydride battery pack can be purchased that has a nominal capacity of 2500 mAh. With a budget of $100, 7 batteries can be purchased that would be directly compatible with both the charging system and pod car system.

Tuesday, April 18, 2017

Post-Paseo

After presenting at Paseo Public Prototyping Fair, there were several issues that the Small Scale Teams would like to be addressed before Maker’s Faire. The runtime per battery were roughly 20 to 30 minutes according to Chris from the Controls Team. With a charge time of an hour, the rate of energy usage is double that a solar panel can recharge the battery. The goal is to achieve 100% renewable energy for the 1/12 scale Spartan Superway model.

A simple solution to increase the amount of solar energy converted to charge batteries is to utilize an additional solar panel. Two solar panels will allow the system to charge two batteries fully within an hour. This second solar panel was also a planned deliverable since the beginning of this project.


Being a team of only one person, constructing a second solar rack to house and support a second solar panel would take up tremendous amount of time. The condition and functionality of the second set of charging components are unknown and will need to be tested. These components will be tested and replaced if needed. In order accomplish this goal in a timely manner, I’ve enlisted the help of Kevin from the Track Manufacturing Team. Kevin agreed to help construct the second solar rack. I am to provide all materials necessary. By using leftover materials from the first solar rack, I have created a Bill of Material. Materials will be purchased this week and dropped off to Kevin along with the constructed solar rack.

Tuesday, April 4, 2017

Spring Break

Solar panel support frame fabrication began with cutting aluminum bar stock down to proper lengths. Each half of the support frame consists of (2) 5 feet and (4) 1 foot pieces. Two L-brackets were used at each corner to form a rectangular box frame. Holes were drilled for bolts and nuts to mate L-brackets and aluminum bar stock.
 
Holes were drilled for bolts and nuts to mate the two box frames together. With the two halves constructed and connected, measurements were made to place the supports that will connect to the two tilting mechanisms. The placement of the ribs were laid out to avoid interfere with supports. Holes were drilled on the sides of the frames, ribs, and clamps. Adjustments were made to ensure there was enough room to slide the solar panel between the ribs and clamp.


Acrylic panels were purchase to fabricate a box to house the charging components. These pieces will need to be cut down to dimension and bolted together. With the box fabricated and sliders attached to the box, the position and placement can be determined to make connections onto the solar panel frame.